Tiếp tục với loạt bài viết ” học Javascript – Jquery – Vue js qua từng bài tập “.Ở bài viết này thì mình sẽ hướng dẫn các bạn thực hiện bài tập bind list data. Chúng ta sẽ đi luôn vào bài tập

Yêu cầu:
- Nắm được Javascript căn bản củ thể là phần JS HTML DOM, tất nhiên thì chưa nắm vững cũng không sao.
- Khi đọc xong một bài viết bắt tay vào thực hành với bài tập đó.
- Nếu như trong quá trình làm bài tập gặp phải một vấn đề gì đó thì bạn nên hỏi google. Nếu không tìm được câu trả lời thì mới để lại comment. Bạn nên nhớ google là một kĩ năng không thể thiếu của Dev.
Bài tập căn bản 02: bind list data

Click vào đây để xem demo.
Mô tả bài tập
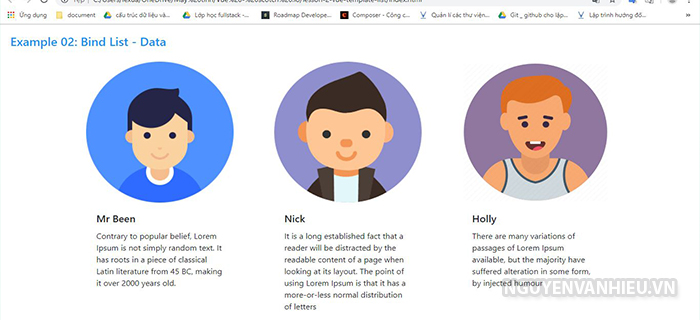
- Ví dụ mình có một chuỗi dữ liệu JSON là danh sách User gồm họ tên, ảnh đại diện , và thông tin mô tả từ server đẩy xuống. Mình được nhận yêu cầu sẽ xuất danh sách User này ra HTML
# Javascript
Mình sẽ code và giải thích chi tiết ngay phía dưới.
index.html
<!DOCTYPE html>
<html lang="en">

<head>
    <meta charset="UTF-8">
    <meta name="viewport" content="width=device-width, initial-scale=1.0">
    <meta http-equiv="X-UA-Compatible" content="ie=edge">
    <title>Document</title>
    <link rel="stylesheet" href="https://stackpath.bootstrapcdn.com/bootstrap/4.3.1/css/bootstrap.min.css">
    <style>
        li {
            list-style: none;
        }

        h4 {
            padding: 20px;
            color: #2196F3;
        }
    </style>
</head>


<body>
    <h4>
        Example 02: Bind List - Data
    </h4>
    <div id="app">
        <div class="container">
            <ul class="row">

            </ul>
        </div>
    </div>
   <script src="https://cdn.jsdelivr.net/npm/vue/dist/vue.js">
   </script> <script src="https://code.jquery.com/jquery-3.4.1.min.js">
   </script> <script src="script.js"></script>
</body>

</html>
Chúng ta sẽ sử dụng chung file index.html này cho cả javascript, jquery và vue js. Mình có sử dụng bootstrap để giao diện dễ nhìn.
script.js
// data
let users = [{
        name: 'Mr Been',
        description: 'Contrary to popular belief, Lorem Ipsum is not simply random text. It has roots in a piece of classical Latin literature from 45 BC, making it over 2000 years old.',
        avatar: 'http://60nam.dhhp.edu.vn/wp-content/uploads/2019/03/user.png'
    },
    {
        name: 'Nick',
        description: 'It is a long established fact that a reader will be distracted by the readable content of a page when looking at its layout. The point of using Lorem Ipsum is that it has a more-or-less normal distribution of letters',
        avatar: 'https://encrypted-tbn0.gstatic.com/images?q=tbn:ANd9GcRPxjRIYT8pG0zgzKTilbko-MOv8pSnmO63M9FkOvfHoR9FvInm'
    },

    {
        name: 'Holly',
        description: 'There are many variations of passages of Lorem Ipsum available, but the majority have suffered alteration in some form, by injected humour',
        avatar: 'https://cdn4.iconfinder.com/data/icons/avatars-circle-2/72/108-512.png'
    }
]

// bind data
document.addEventListener('DOMContentLoaded', function() {
    let userList = document.querySelector('ul');

    users.forEach(injectUserToList)

    function injectUserToList(user) {
        let userItem = document.createElement('li');
        userItem.classList.add('col-sm');
        userItem.innerHTML = `<div style="width: 18rem;"> <img src="${user.avatar}" class="card-img-top" alt="..."> <div class="card-body"> <h5 class="card-title">${user.name}</h5> <p class="card-text">${user.description}</p> </div> </div>`;
        userList.appendChild(userItem);
    }
})- Vì đây là bài tập căn bản nên mình sẽ không lấy dữ liệu từ server xuống mà tạo ra một mảng dữ liệu user list.
- Tiếp theo mình sẽ lặp qua mỗi phần tử của
userListbằng phương thứcforEachvà call back functioninjectUserToList - Trong function
injectUserToListmình sẽ tạo nên một cái<li>và thêm nội dung cho nó bằng phương thứcinnerHTML(). Và cuối cùng là đẩy dữ liệu ra html bằng method appendChild<li>hiện tại vàoul
Kết quả là mình đã đẩy được user list kia ra html, còn một cách nữa là nối chuỗi rồi đẩy dữ liệu ra. Không cần phải làm các bước như trên.
# Jquery
// data
let users = [{
        name: 'Mr Been',
        description: 'Contrary to popular belief, Lorem Ipsum is not simply random text. It has roots in a piece of classical Latin literature from 45 BC, making it over 2000 years old.',
        avatar: 'http://60nam.dhhp.edu.vn/wp-content/uploads/2019/03/user.png'
    },
    {
        name: 'Nick',
        description: 'It is a long established fact that a reader will be distracted by the readable content of a page when looking at its layout. The point of using Lorem Ipsum is that it has a more-or-less normal distribution of letters',
        avatar: 'https://encrypted-tbn0.gstatic.com/images?q=tbn:ANd9GcRPxjRIYT8pG0zgzKTilbko-MOv8pSnmO63M9FkOvfHoR9FvInm'
    },

    {
        name: 'Holly',
        description: 'There are many variations of passages of Lorem Ipsum available, but the majority have suffered alteration in some form, by injected humour',
        avatar: 'https://cdn4.iconfinder.com/data/icons/avatars-circle-2/72/108-512.png'
    }
];
//bind data
$.each(users, function(index, user) {
    $('ul').append(`<li class="col-sm"><div style="width: 18rem;"> <img src="${user.avatar}" class="card-img-top" alt="..."> <div class="card-body"> <h5 class="card-title">${user.name}</h5> <p class="card-text">${user.description}</p> </div> </div></li>`);
});- Ý tưởng cũng như Javascript thuần ở trên là lặp qua từng phần tử của userList. Rồi append vào
ulnhưng với Jquery thì khỏe hơn nhiều - Chúng ta chỉ cần sử dụng hàm append() của đối tượng Jquery là có thể thêm được dữ liệu vào element
ul
# Vue js
index.html
        <h4>
            Example 02: Bind List - Data
        </h4>
        <div id="app">
            <div class="container">
                <ul class="row">
                    <li class="col-sm" v-for="user in users">
                        <div style="width: 18rem;">
                            <img v-bind:src="user.avatar" class="card-img-top" alt="...">
                            <div class="card-body">
                                <h5 class="card-title">{{user.name}}</h5>
                                <p class="card-text">{{user.description}}</p>
                            </div>
                        </div>
                    </li>

                </ul>
            </div>
</div>- Như bài trước thì mình có nói là chúng ta phải thêm root element để sử dụng template của Vue. Đơn giản bằng cách đặt
<div id="app">bao quanh phần nội dung html muốn sử dụng các directive (chỉ thị) của Vue. Chú ý các directivev-forvàv-bind {{ }}
vue.js
var app = new Vue({
    el: '#app',
    data: {
        users: [{
                name: 'Mr Been',
                description: 'Contrary to popular belief, Lorem Ipsum is not simply random text. It has roots in a piece of classical Latin literature from 45 BC, making it over 2000 years old.',
                avatar: 'http://60nam.dhhp.edu.vn/wp-content/uploads/2019/03/user.png'
            },
            {
                name: 'Nick',
                description: 'It is a long established fact that a reader will be distracted by the readable content of a page when looking at its layout. The point of using Lorem Ipsum is that it has a more-or-less normal distribution of letters',
                avatar: 'https://encrypted-tbn0.gstatic.com/images?q=tbn:ANd9GcRPxjRIYT8pG0zgzKTilbko-MOv8pSnmO63M9FkOvfHoR9FvInm'
            },

            {
                name: 'Holly',
                description: 'There are many variations of passages of Lorem Ipsum available, but the majority have suffered alteration in some form, by injected humour',
                avatar: 'https://cdn4.iconfinder.com/data/icons/avatars-circle-2/72/108-512.png'
            }
        ]
    }
})
var app = new Vue( config)tạo ra object app- Bạn quan sát ở đây mình có khai báo 2 cái key là
el="#app"vàdata = { }. Chúng là các thuộc tính cơ bản của object Vue.elkhai báo template,datagồm một object chứa các thuộc tính. - Chúng ta chỉ cần tạo ra một key
userstrong objectdata, khi khai báo như thế này uses đã trở thành một thuộc tính của object Vue.app - Các directive sử dụng trong template:
v-forxuất dữ liệu mảng và objectv-bind:bind property của element html{{}}bind content của element html
Mọi người có thể tham khảo thêm các directive khác tại đây. Vậy là mình đã thực hiện xong bài tập bind list data. Mình sẽ thực hiện thêm thật nhiều bài tập khác, chào các bạn.
Xem bài viết tiếp theo tại đây


Để lại một bình luận